Crotchet Hat Pattern!

So I came across some yarn a few weeks ago and decided to work on some 18in doll hats in the off-season.  This may or may not be related to my new subscription to Netflix.  Movie and Crafts!!  Mostly snug to the head and beret style caps, although Mom is requesting one with a brim, so we’ll see how that will go.  For all of these hats I used a “H” size hook and regular weight yarn.  More pattern variations on the way!

The first hat is a snug sock cap and inspired by one of the yarn skeins in a camo color.   It’s not a color scheme I normally work with, but thought it would go over well in the rural area where I am currently living.  So I worked out a pattern.  Having the doll handy is helpful for sizing.  Tension gauge is about 4sc = 1 in, 5sc rows = 1 in.

Cap with small Camo Pattern
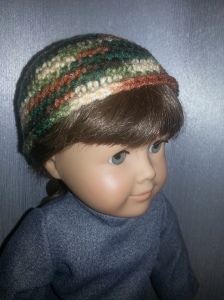
20130616_142211Row 1:
sc 2. dc in first chain and make 11 more dc in the same hole.  sls to make a circle.

Row 2:
Chain 1 and sc in first chain.  2 sc in next stitch, 1 sc in next stitch and repeat to complete the row. sls to finish the round.

Row 3:
Chain 1 and sc in first stitch.  2 sc in next stitch, 1 sc in next stitch and repeat to complete the row.  sls to finish the round.

Row 4:
Chain 2 and dc in first stitch.  2 dc in next stitch, 1 dc in next stitch and repeat to complete the row. sls to finish the round.

Row 5-6:
Chain 2 and sc in next 3 stitches.  2 sc in next stitch, sc in next four stitch, and repeat to complete the row. sls to finish the round.

Row 7-12:
Chain 2 and sc in first stitch.  sc in each stitch to complete the row. sls to make finish the round circle.

Cap with Large Camo Pattern

Row 1:
sc 2. dc in first chain and make 11 more dc in the same hole.  sls to make a circle.

Row 2:
Chain 1 and sc in first chain.  2 sc in next stitch, 1 sc in next stitch and repeat to complete the row. sls to finish the round.

Row 3:
Chain 1 and sc in first stitch.  2 sc in next stitch, 1 sc in next stitch and repeat to complete the row.  sls to finish the round.

Row 4:
Chain 2 and dc in first stitch.  2 dc in next stitch, 1 dc in next stitch and repeat to complete the row. sls to finish the round.

Row 5:
Chain 2 and dc in next 3 stitches.  2 dc in next stitch, dc in next four stitch, and repeat to complete the row. sls to finish the round.

Row 6-8:
Chain 2 and dc in first stitch.  dc in each stitch to complete the row. sls to finish the round.

Row 9:
Chain 2 and sc in first stitch.  sc in each stitch to complete the row. sls to make finish the round circle

To Add a Brim

Row 10-14:
Chain 2 and sc in first stitch.  sc in each stitch to complete the row. sls to make a circle

Turn hat to where the tail end is inside and flip up row 11-14 to make the brim.

How To: T-shirt Quilt (Quilting)

Finishing Your Quilt

Now you’re at the quilting stage of your quilt.  Here is where you decide if you’re going to tie-tack, hand, machine, or ‘Quilt as You Go’.  However, if you are going to ‘Quilt As You Go’ – that will effect how you will put your quilt together in previous steps.  To learn more about ‘Quilt As You Go’, click here or check out this site. ‘Quilt As You Go’ is handy for larger/thicker quilts where you can’t get the quilt under the arm of the machine.

To learn about tie-tack quilting, go here.

To learn about hand quilting, go here.

For our quilt, we decided to machine quilt.  The design was going to be pretty simple, just going ‘in the ditch’ where the pieces come together.  It would give us the support we needed, and not get in the way of the design.  I have seen machine quilting all over the design, and it looks nice…but it’s just personal preference.

Supplies

As for supplies, you will want to purchase a high quality thread (aka not the cheap stuff).  We used regular thread for ours, but if you are working on a thick quilt, then you might want to use a different thread.  This is where your fabric store associate can come in handy.

Fill a fresh bobbin to limit the chance of running out of thread mid-row.  Check your thread after each row.

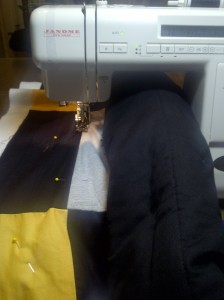
One of the reasons you pin the quilt together is to keep the fabric from ‘walking’ and puckering your fabric.  Work slow and set the speed of your machine down if you can.  To limit walking, we used a walking foot (pictured at right).    It is a handy thing to you have and you will be very satisfied in the result.  A walking foot is a great investment and is hand on knits and slick fabrics.

Setting Up To Quilt

Set up your sewing machine on your large workspace so most of the weight of the quilt and the machine are on the same surface.  This will limit unwanted pulling as you sew.  If you have a plastic shelf that slides onto your sewing machine, all the better.

Having a second set of hands will make this easier.  Starting with your vertical quilting, tightly roll your pinned quilt so that it will fit under the arm of your sewing machine.  Make sure that you sew in the same direction to limit walking.  Start on the far side, see picture at right.  Remove pins as your sew, so you don’t risk breaking your needle.  Check your sewing as you go, especially the back side.  Correct as you go.  Unroll as you go to make the rows.

Rotate and do the same with your horizontal quilting.  Once you’ve checked the back of the quilt. sew along the outer edge.  Trim excess batting and backing.

Binding

Prep your binding.  We had enough of the backing to make our binding out of it.  Matching black is a pain and so we decided this would be the best bet.  It ended up being straight grain binding, but that will work since I won’t be using the quilt on a regular basis.  Follow the direction on your package of binding or these instructions.  Sewing your binding with a machine will give you a cleaner look, but if you want to hand sew the last step, it will give you a hand-made finished look.

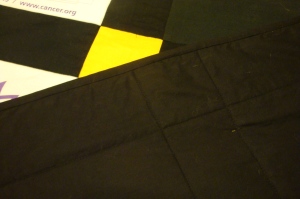
Here is a picture of our finished binding and you can see the quilting as well.

At this point, tie off any loose ends and work them into the quilt.  Enjoy your quilt and show it off!  It’s a personal work of art!

After finishing my quilt, I had some extra material left over so I will be making a matching pillow case and travel bag.  Check back later for the results!

Table of Contents
How To: T-shirt Quilt (Introduction)
How To: T-shirt Quilt (Tools)
How To: T-shirt Quilt (Fabric and Sashing)
How To: T-shirt Quilt (Fusing and Piecing)
How To: T-shirt Quilt (Assembly)
How To: T-shirt Quilt (Quilting)

How To: T-shirt Quilt (Assembly)

Assembly of your T-shirt Quilt

Now you’re ready to put together the front of your quilt.  Work in rows, then sew the rows  together.

Check to make sure the seams line up and the finished
size is the same.  Adjust your work and fix as needed.  Decide if you’re going to iron the seams flat or to either side of the seam.

Placing the Backing

Setup a work space. it needs to be a flat surface and hopefully big enough to fit most of the quilt.

Place backing fabric right side down on surface.

Smooth flat and then lay batting fabric on the backing.

Smooth again and place quilt top on batting.

Scatter pin the layers together.  Working in sections, pin the layers together starting in the center and working your way out.  Pin often, smooth out extra fabric, and double check that the backing isn’t puckering.

Table of Contents
How To: T-shirt Quilt (Introduction)
How To: T-shirt Quilt (Tools)
How To: T-shirt Quilt (Fabric and Sashing)
How To: T-shirt Quilt (Fusing and Piecing)
How To: T-shirt Quilt (Assembly)
How To: T-shirt Quilt (Quilting)

How To: T-shirt Quilt (Fusing and Piecing)

About Interfacing

Interfacing gives support to fabric and in the case of T-shirt quilts, shape.  The comfortable part of the garment is the ability to stretch and move…and this advantage is a huge disadvantage when quilting.  So a fusing is required to keep the pieces square.  There are two types of interfacing, fusible and non-fusible.  For this project I used fusible interfacing.

Cutting the Fusing

Cut pieces to match the size of your t-shirt blocks.

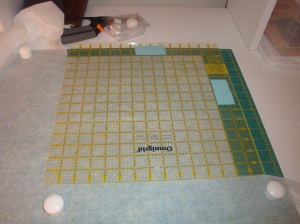
A rotary ruler and cutter make this really easy.

Lining Up the Fusing

Read the installation instructions on the interfacing packaging.  Find a ironing surface that will work for the size of your block so you can keep moving to a minimum.  I used a quilting mat to keep the pieces lined up, but a ironing board works well.

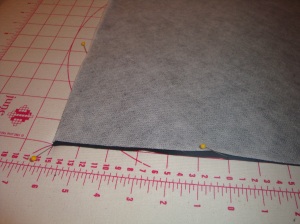
Lay the t-shirt piece face down and then lay the fusible on top.  Make sure the bumpy fusible side of the interfacing is fabric side down!  Use pins to keep the pieces together.   We place the pieces this way to keep the t-shirt printing away from the direct heat of the iron and the fusible side of the interfacing away from the iron.


Ironing the Fusing to Fabric

Set the iron on a low setting, this is especially true for t-shirt pieces that have a lot of printing on the front.

Start ironing in the center using an up and down motion so the fabric doesn’t ‘walk’ on you.   Work your way out and iron to just barely fuse the interfacing to the fabric.


Table of Contents
How To: T-shirt Quilt (Introduction)
How To: T-shirt Quilt (Tools)
How To: T-shirt Quilt (Fabric and Sashing)
How To: T-shirt Quilt (Fusing and Piecing)
How To: T-shirt Quilt (Assembly)
How To: T-shirt Quilt (Quilting)